Ad Campaigns
What This Guide Does — Walks you through Ad Campaigns: connecting ad accounts, monitoring campaign performance, and launching your first campaign.
Why It Is Useful — Ad Campaigns helps you run and monitor paid ad campaigns across platforms from inside NOMMOS, with AI recommendations to help you spend more effectively.
Before You Start — Have an ad account (Meta, Google Ads, TikTok, X, LinkedIn, or ChatGPT Ads) ready to connect, along with a rough budget in mind.
flowchart LR
    A["Open Ad Campaigns"] --> B["Monitor performance,
campaigns & trends"]
    B --> C["Connect or manage
an ads account"]
    C --> D["Create campaign &
choose platform"]
    D --> E["Complete campaign
details"]
    E --> F["Review and launch"]
How to Use It
Open Ad Campaigns
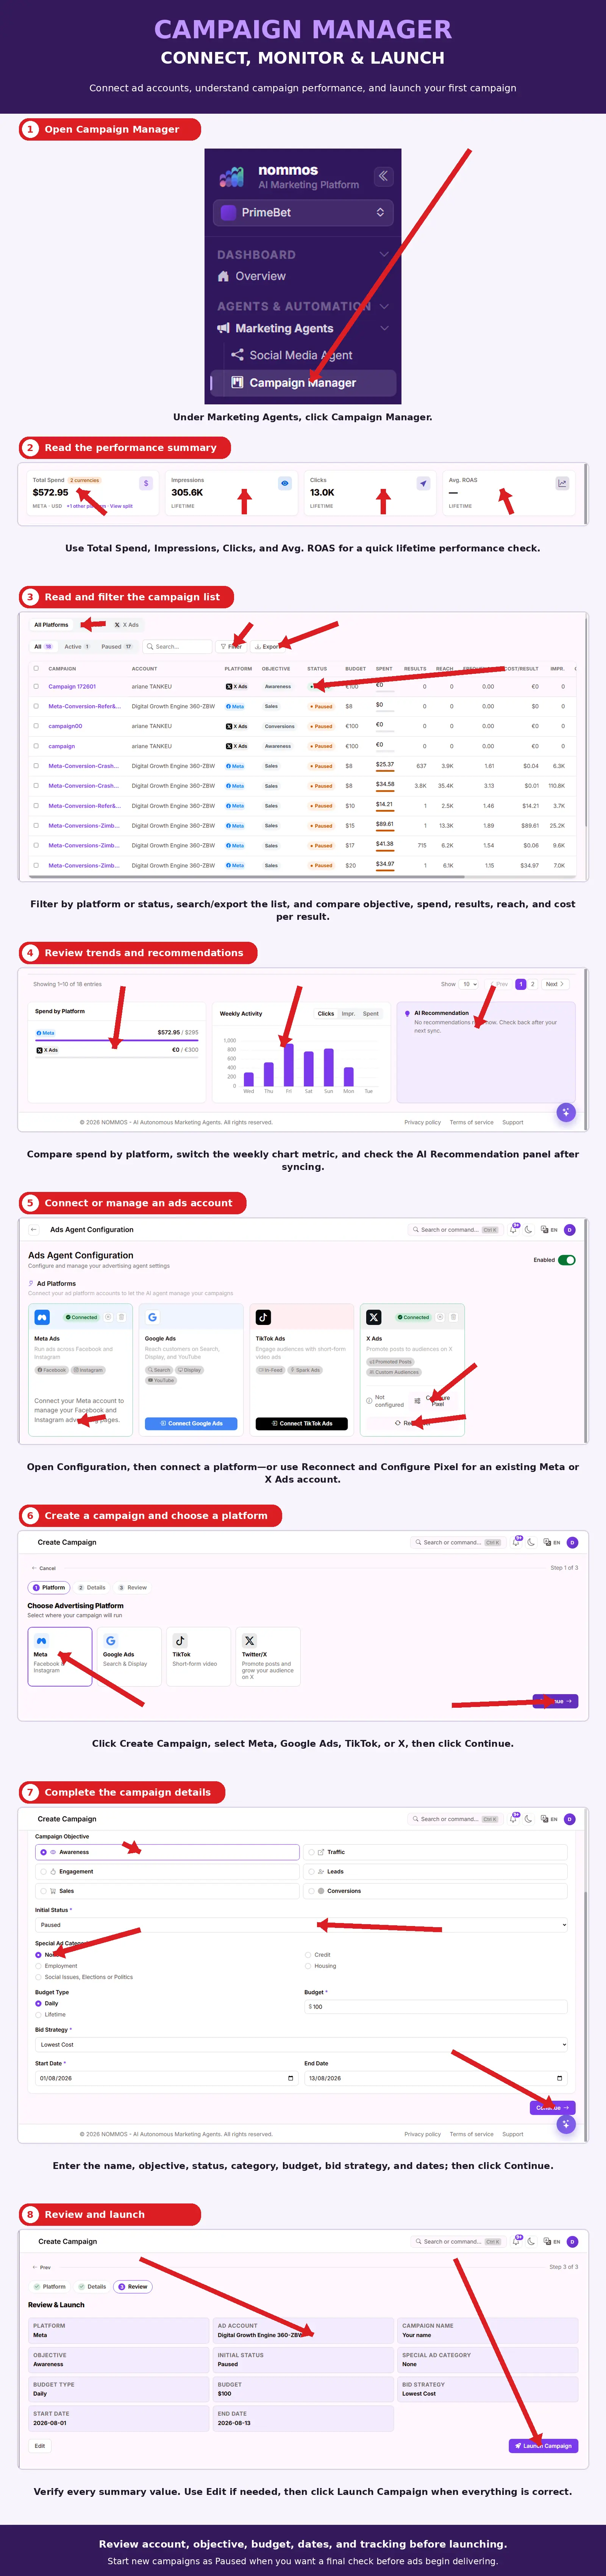
Under Social Media & Advertising, select Ad Campaigns.
Read the Performance Summary
Use Total Spend, Impressions, Clicks, and Avg. ROAS for a quick lifetime performance check.
Read and Filter the Campaign List
Filter by platform or status, search or export the list, and compare objective, spend, results, reach, and cost per result.
Review Trends and Recommendations
Compare spend by platform, switch the weekly chart metric, and check the AI Recommendation panel after syncing.
Connect or Manage an Ads Account
Open Configuration, then connect a platform — or use Reconnect and Configure Pixel for an existing Meta, X Ads, LinkedIn Ads, or ChatGPT Ads account.
Create a Campaign and Choose a Platform
Select Create Campaign, choose Meta, Google Ads, TikTok, X, LinkedIn, or ChatGPT Ads, then select Continue.
Complete the Campaign Details
Enter the name, objective, status, category, budget, bid strategy, and dates, then select Continue.
Review and Launch
Verify every summary value. Use Edit if needed, then select Launch Campaign when everything is correct.
What You Should See — Your new campaign appears in the campaign list with a Status of Active once launched, and its spend and results begin populating as it runs.
Tips
- Review account, objective, budget, dates, and tracking before launching.
- Start new campaigns as Paused when you want a final check before ads begin delivering.
Ads That Open a WhatsApp or Messenger Chat
A Meta ad normally sends people to a web page. It can instead open a chat, so a tap becomes a conversation you answer in the Inbox rather than a visit you hope converts. You choose this on the ad set, inside a Meta campaign, and the option appears only for the campaign objectives Meta allows it on.
Before You Start — Have the Facebook Page people will be messaging. For WhatsApp, that Page also needs a WhatsApp number linked to it in Meta Business Suite; NOMMOS checks the Page as you pick it and tells you when the number is missing.
Open a Meta Campaign and Add an Ad Set
Open the campaign from the campaign list, go to the Ad Sets tab, and select New Ad Set.
Choose the Destination
Pick Website, Messenger, or WhatsApp on the first step. Meta fixes this when the ad set is created, so it cannot be changed afterwards.
Pick the Page and the Number
Choose the Facebook Page people will message. For WhatsApp, keep "Use the number linked to the page" or enter a different number.
Set the Performance Goal
The goal list narrows to what Meta accepts for that destination, and billing locks to Impressions — messaging ads are always billed that way.
Choose Where the Ad Appears
Placements that cannot carry a chat are removed. On a WhatsApp ad set, WhatsApp Status becomes available.
Create the Ad and Write the Welcome Message
The ad has no destination URL. Instead you write the greeting and either the tappable questions or the pre-written message.
Check the Conversation Preview
The preview switcher gains a Conversation tab showing the chat that opens after the tap, including your greeting and questions.
Messenger and WhatsApp side by side
| Messenger | ||
|---|---|---|
| Where the chat opens | A Messenger conversation with your Page. | A WhatsApp conversation with your business number. |
| What you need | A Facebook Page the ad account may advertise. | The same Page, with a WhatsApp number linked to it. |
| Campaign objectives | Engagement, Traffic, Sales. | Engagement, Traffic, Sales, Leads. |
| Button on the ad | Send Message, or Learn More. | Send WhatsApp Message, or Learn More. |
| Conversation opens with | Tappable questions, by default. | A pre-written message, by default. |
| Extra placement | — | WhatsApp Status. |
The Welcome Message
The welcome message is the first thing someone sees after tapping your ad, and it is written on the ad rather than in Messenger or WhatsApp. It has two parts:
- Greeting — the opening line. Use
{{user_first_name}}to greet each person by name. - How the conversation starts — either Tappable questions, up to three question-and-answer pairs where one tap sends the question and your answer comes back instantly, or a Pre-written message already typed for the person, who only has to press send. Leave the pre-written message blank to use Meta's default.
Ask for a name or a phone number in one of the tappable questions and the reply already tells you who the person is, which is what turns the conversation into a usable lead. Questions are limited to 80 characters and answers to 300.
The WhatsApp Status Placement
WhatsApp Status is the Updates tab in WhatsApp. It is a placement on a WhatsApp ad set, not a separate destination, so you reach it by selecting WhatsApp on step 2 and then ticking WhatsApp Status under the WhatsApp placement group.
- It always runs with Instagram Stories. Meta does not allow Status on its own, so NOMMOS selects Instagram Stories alongside it automatically.
- It is full screen and vertical. Use a 9:16 image or video — 1080 × 1920 is the safe size. Anything else still publishes, but NOMMOS warns you that Meta may crop or letterbox it.
- Video comes from the Media Library. Pick a video the way you pick an image; NOMMOS uploads it to Meta once and reuses it afterwards. You can set your own thumbnail or let Meta generate one.
- The preview matches the placement. The ad preview gains a WhatsApp Status frame that plays the video as people will see it.
What You Should See — The ad set shows its destination on the Ad Sets tab, the ad shows the Send WhatsApp Message or Send Message button in every preview, and replies from people who tapped the ad arrive in the Inbox.
Tips
- Decide the destination before creating the ad set. Changing your mind later means a new ad set.
- Messenger is not available under the Leads objective — Meta only allows that pairing through its own lead forms. Use WhatsApp for a Leads campaign that opens a chat.
- Write the greeting and the questions before checking the preview; both update as you type.
ChatGPT Ads
ChatGPT Ads places a sponsored card below a ChatGPT answer, matched to what the person is asking. It works like the other advertising platforms in NOMMOS — you connect an ad account, build a campaign, and read its results on the same screens — with three differences worth knowing before you start: you connect it with a key rather than a login, the middle level is called an ad group, and the creative is a chat card rather than a feed post.
Before You Start — Have an OpenAI Ads Manager account whose brand review is approved, and permission to create an API key on it.
Create a Key in OpenAI Ads Manager
In OpenAI Ads Manager, open Settings, then API keys, and create a key for the ad account you want to manage. One key opens exactly one ad account.
Connect the Account
In Ad Campaigns, open Configuration, find ChatGPT Ads, select Connect ChatGPT Ads, and paste the key. NOMMOS checks it with OpenAI before saving anything.
Create the Campaign
Select Create Campaign, choose ChatGPT Ads, then set the objective, the budget and the dates. Leave the start date empty to begin delivering as soon as the campaign is activated.
Choose Locations and Surfaces
On the Location step, include or exclude countries, regions and markets, and pick the ChatGPT surfaces — the apps and the web. Selecting none means everywhere and every surface.
Add an Ad Group
On the campaign's Ad Groups tab, name the group, write context hints, then set what you pay for and how much.
Add a Chat Card
On the Ads tab, write the title and text, choose an image, set the destination, and save. The ad goes to OpenAI for review.
Watch the Review and the Results
The ad shows its review verdict and any serving issue. Once it delivers, the Overview and Breakdown tabs show where it was seen.
Connecting an Account
ChatGPT Ads is connected with a key instead of a login window, so there is nothing to authorize and nothing to reconnect when a session expires. A few consequences:
- One key, one ad account. To manage a second ad account, select Add another ad account and paste that account's key.
- The key is stored encrypted and never shown again. To rotate it, paste a new key for the same account.
- A rejected key is flagged. If OpenAI stops accepting a key, the account is marked so on the Configuration page and you paste a new one.
- Brand review is OpenAI's, not ours. An account only serves ads once OpenAI has approved its name and logo. The account row shows that status; complete the review in Ads Manager and use the refresh icon to check again.
What Is Set Where
ChatGPT campaigns hold their targeting and their budget at the top, which is the opposite of Meta. It is worth knowing before you look for a setting on the wrong screen.
Campaign, ad group and ad
| Level | What it carries |
|---|---|
| Campaign | Objective, budget and schedule, locations and ChatGPT surfaces. The objective is fixed when the campaign is created and cannot be changed afterwards. |
| Ad group | Context hints, what you pay for, the bid strategy and the amount. |
| Ad | The chat card itself — title, text, optional price, image and destination. |
Objectives — Awareness pays for impressions, Traffic pays for clicks, and Conversions optimises toward one conversion event you choose when the campaign is created. A Conversions campaign needs that event to exist first, so set up conversion tracking before building one.
Context hints describe when your ads are useful — "people comparing family cars under thirty thousand", not a keyword list. They guide when the card appears; they are not targeting, and locations and surfaces still decide who is eligible to see it.
Bidding follows the objective: a fixed bid where you set the amount and adjust it yourself, or Maximize Clicks and Maximize Conversions, where OpenAI adjusts the bid for you. The two maximize strategies need a daily campaign budget, so a campaign with a lifetime budget offers only a fixed bid.
The Chat Card
A chat card is a title, a short text, one image and a link, shown below a ChatGPT answer. The limits are OpenAI's and the form enforces them as you type:
- Title — 3 to 50 characters.
- Text — up to 100 characters.
- Price — optional, shown on the card.
- Image — JPEG, PNG or WebP, at least 640 × 640 pixels, picked from the Media Library. It is uploaded to OpenAI once per ad account and reused.
- Destination — the page the card opens. Leave Use a NOMMOS tracked short link on so visits attribute back to this campaign, or turn it off to send your URL exactly as typed.
Every new or edited card goes to OpenAI for review, so the ad shows In review before it shows Approved. A rejection gives a reason, and where OpenAI visited your landing page you can see what its crawler saw. Use Check with OpenAI on the ad row for the current verdict and any serving issue — a suspended account, an exhausted budget, a landing page that could not be read, a missing payment method.
Conversion Tracking
OpenAI can only optimise for what it can see, so conversions recorded on your own site have to be sent back to it. Set this up per ad account from the Configuration page, on the conversion icon beside the account.
Set the Pixel
Create it through OpenAI, or paste the Pixel ID and data source ID from Ads Manager. The pixel is what your site reports to.
Add the Conversions API Key
A separate key from the one that connects the account, used only to send events from our servers. OpenAI shows it once, so paste it carefully.
Send a Test Event
Confirms the pixel and the key work together. Nothing is recorded.
Define the Conversion Events
One setting per event — a purchase, a lead, a registration — attached to the pixel.
Say What Your Site Reports
Match each tracked action on your site to the ChatGPT event it should report. Both the browser and our servers send it, counted once.
Once events are flowing, Recent events shows roughly the last fifteen minutes of what OpenAI received, from the browser and from our servers, which is the quickest way to confirm a new setup is live. Conversion reporting starts when a setting is attached to a campaign and is never backdated.
What You Should See — The ChatGPT Ads card on the Configuration page lists the connected ad account with an approved brand review, the campaign appears in the campaign list with ChatGPT Ads as its platform, and its cards move from In review to Approved before spend and results begin.
Tips
- Choose the objective carefully — it is the one setting a ChatGPT campaign will never let you change.
- Set up conversion tracking before building a Conversions campaign; it needs an event that already exists.
- Write context hints as sentences about the need your product meets, not as keywords.
Related Guides